# 🔗 Tillhub Webhooks
Real-time event notifications for seamless integration
Tillhub uses webhooks to notify your application when important events occur in your account. Webhooks provide a powerful way to stay synchronized with your Tillhub data through real-time notifications for events like new transactions, product updates, customer changes, and more.
# 📋 Table of Contents
- Quick Start
- Setup Guide
- How Tillhub Uses Webhooks
- Request Format
- Expected Responses & Error Handling
- Implementation Steps
- Security
- Monitoring & Management
- Troubleshooting
- Best Practices
- Advanced Topics
# Quick Start
Get up and running with Tillhub webhooks in minutes:
- Create your endpoint - Set up an HTTPS URL to receive notifications
- Configure webhook - Register your endpoint in the Tillhub Dashboard
- Handle events - Process incoming webhook notifications
- Secure & test - Implement authentication and validate your setup
💡 New to Webhooks?
Webhooks are HTTP callbacks that Tillhub sends to your application when specific events occur. Think of them as real-time notifications that keep your systems in sync automatically.
# Setup Guide
This comprehensive guide will walk you through setting up webhooks in your Tillhub account, from initial configuration to testing and monitoring.
# Prerequisites
Before setting up webhooks, ensure you have:
- [x] Tillhub Account - Active account with appropriate permissions
- [x] HTTPS Endpoint - Publicly accessible URL to receive webhook notifications
- [x] Event Knowledge - Understanding of the events you want to monitor
- [x] Development Environment - Server capable of processing HTTP POST requests
⚠️ HTTPS Required
Your webhook URL must use HTTPS for security. HTTP URLs are only accepted for local development environments.
# Step 1: Access Webhook Configuration
# Navigate to Dashboard
- Login → Go to Tillhub Dashboard (opens new window)
- Settings → Click on Settings in the main navigation
- Webhooks → Select Webhooks from the settings menu
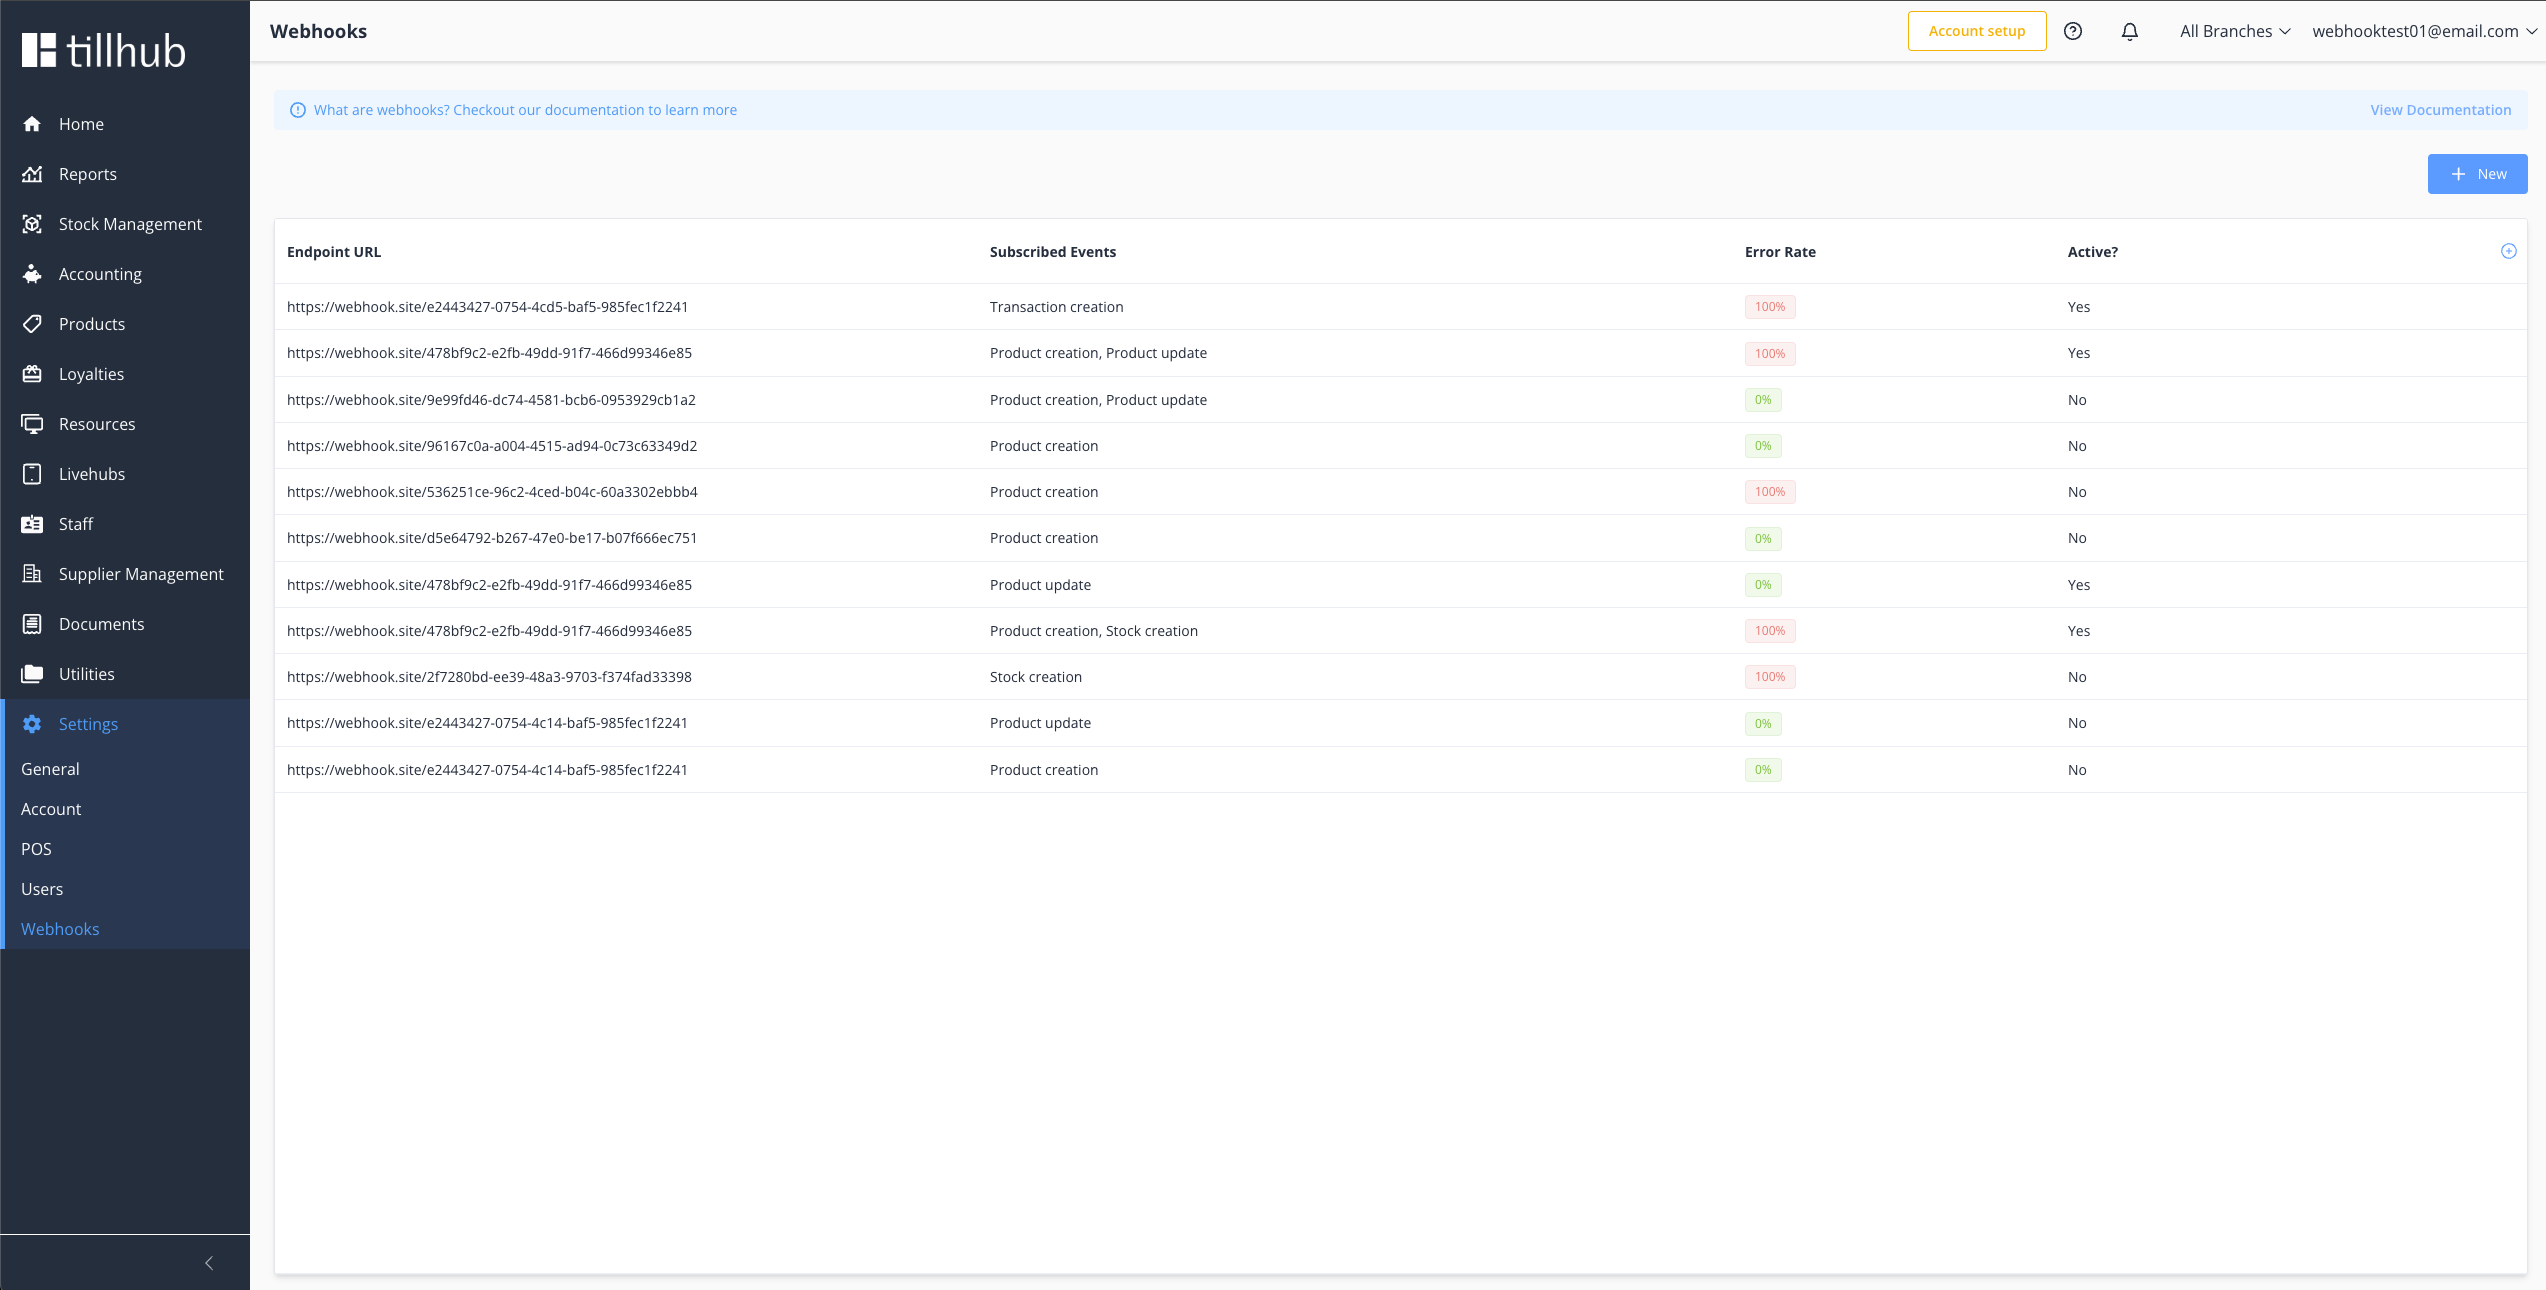
- Overview → View all existing webhooks on the overview page
# Step 2: Subscribe to a Webhook
# Creating Your First Webhook
- New Webhook → Click the New button on the Webhooks Overview page
- Configuration → Complete the webhook configuration form
- Save → Click Save to create and activate your webhook
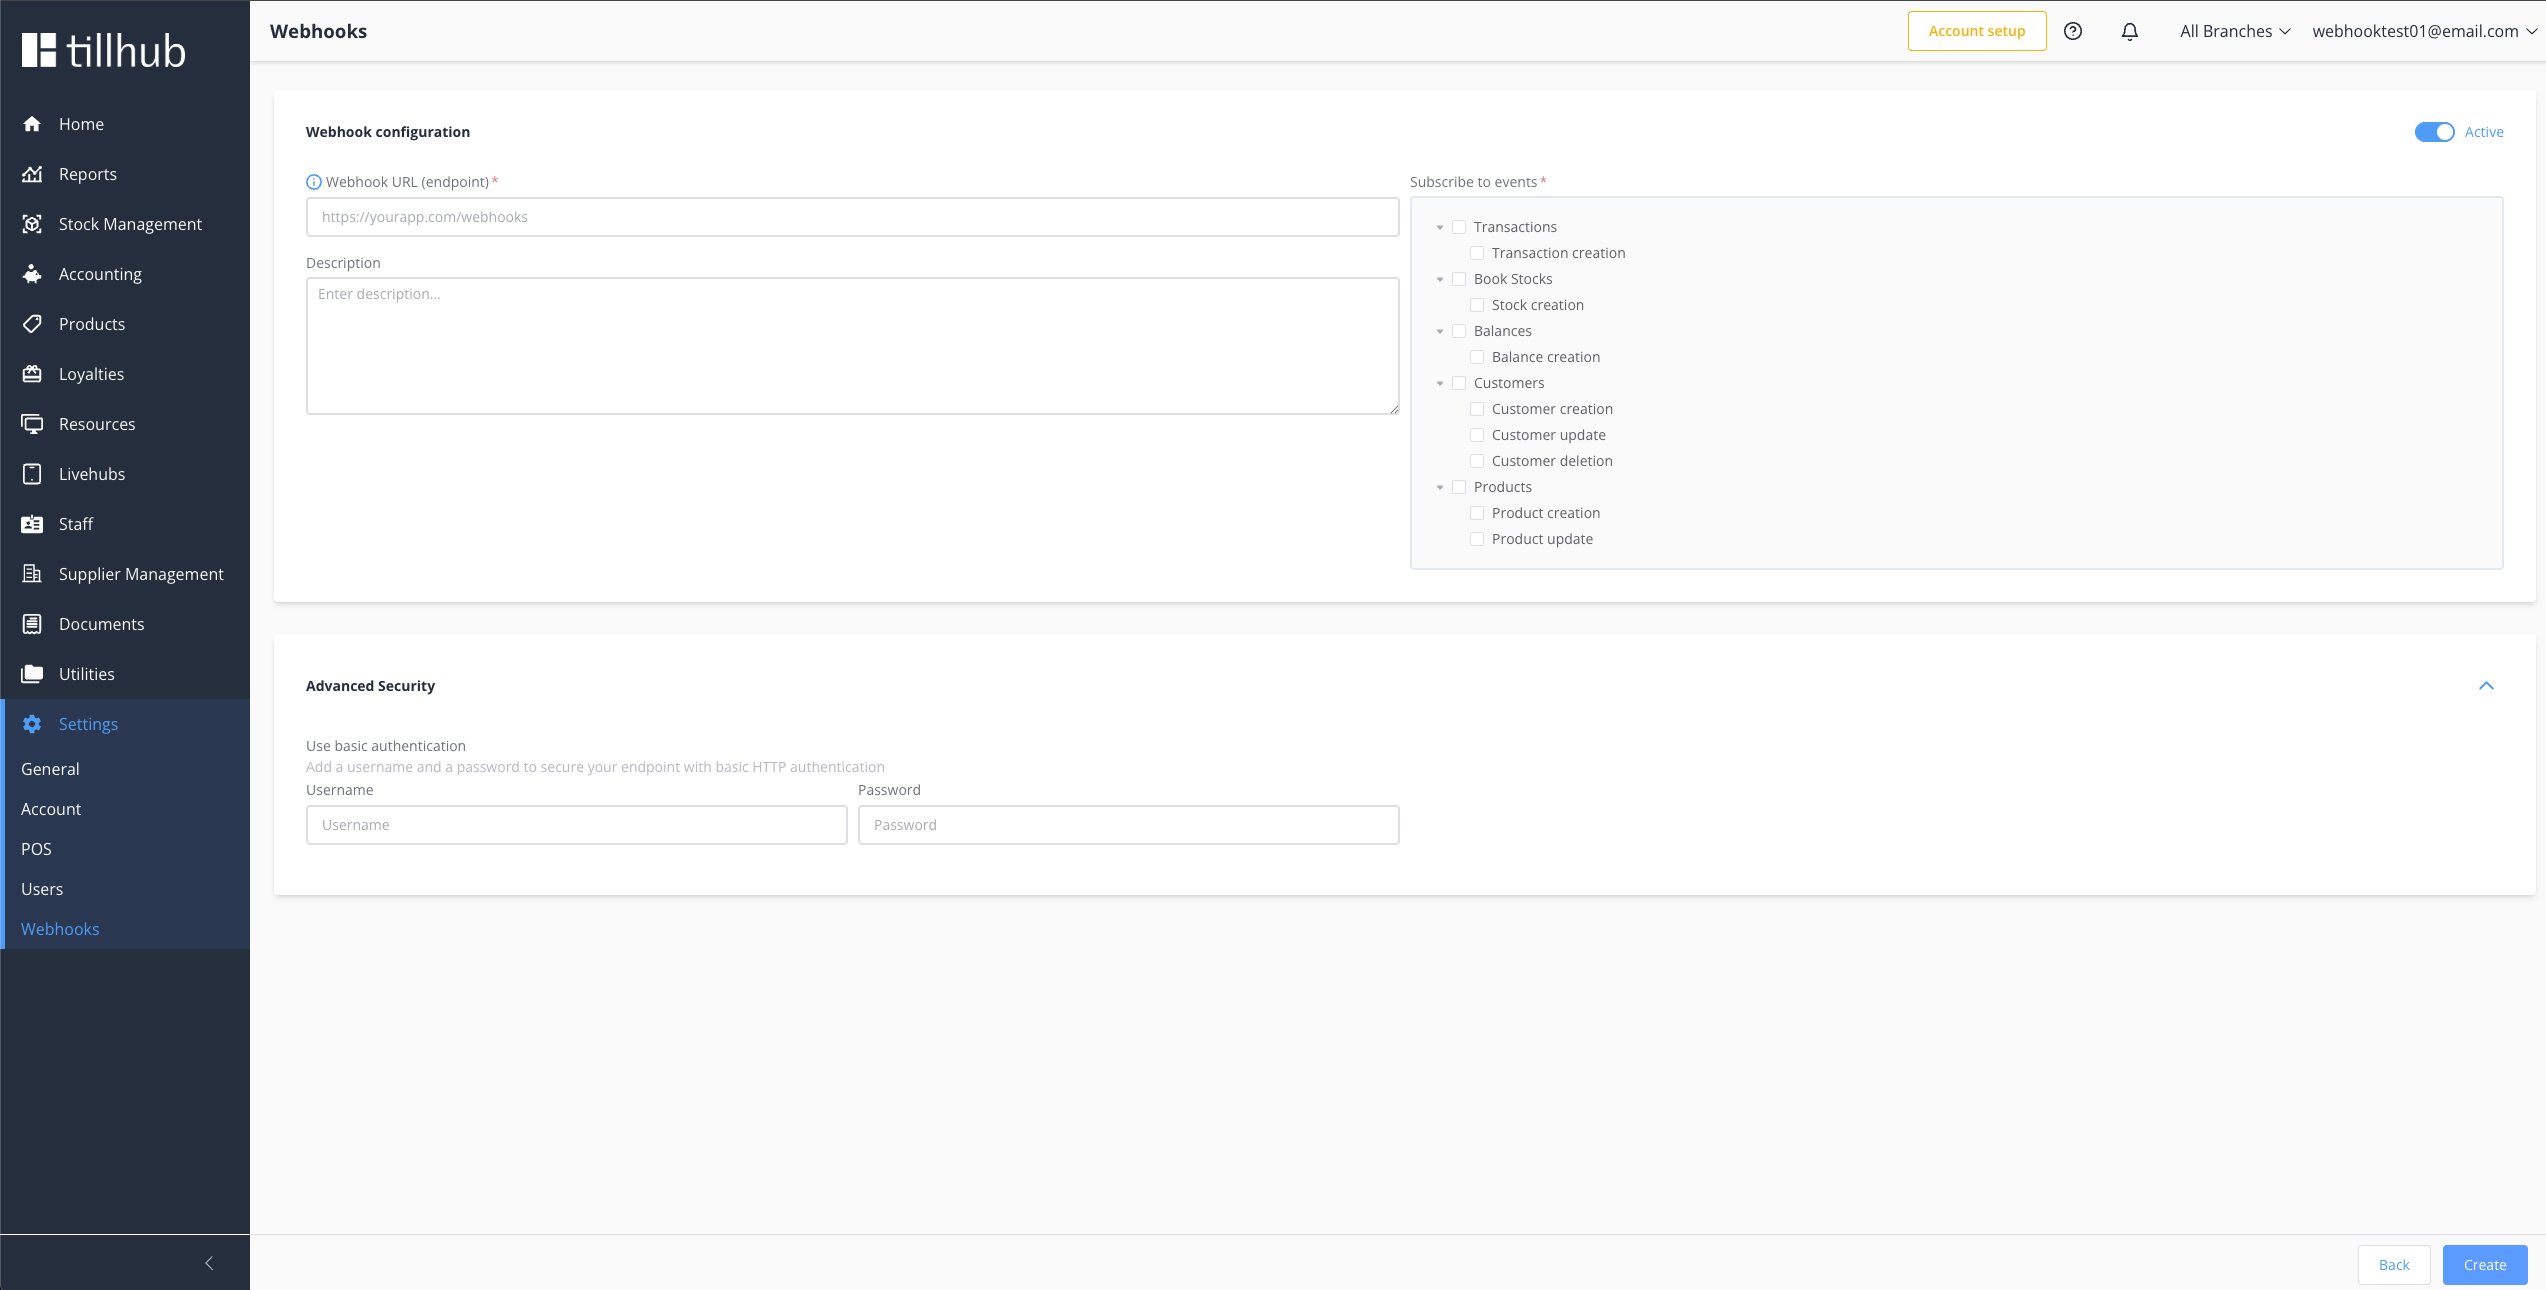
# Required Configuration
| Field | Description | Example | Required |
|---|---|---|---|
| URL | HTTPS endpoint for notifications | https://api.yourapp.com/webhooks/tillhub | ✅ |
| Events | Event types to receive | ["products.create.v0", "products.update.v0"] | ✅ |
# Optional Configuration
Enhance your webhook with these optional settings:
| Field | Description | Use Case | Default |
|---|---|---|---|
| Description | Internal notes about webhook purpose | "Product sync for inventory management" | Empty |
| Active | Enable/disable webhook | Temporary disable without deletion | true |
| Auth User | Basic authentication username | "webhook-user" | None |
| Auth Password | Basic authentication password | "secure-password-123" | None |
🔐 Authentication Options
- Basic Auth: Built-in username/password authentication
- Webhook Signatures: Cryptographic verification (recommended)
- Combined: Use both methods for maximum security
# Security Configuration
Option 1: Basic Authentication
{
  "url": "https://api.yourapp.com/webhooks/tillhub",
  "username": "webhook-user",
  "password": "secure-password-123",
  "events": ["products.create.v0", "customers.update.v0"]
}
2
3
4
5
6
Option 2: Webhook Signatures (Recommended)
- Tillhub automatically generates a signing secret
- Each request includes a cryptographic signature
- Verify signatures to ensure authenticity
- See Security Guide for implementation
🚨 Security Best Practices
- ✅ Always use HTTPS endpoints
- ✅ Implement signature verification
- ✅ Use strong passwords for basic auth
- ✅ Consider IP whitelisting
- ✅ Store secrets securely (environment variables)
# Step 3: Test Your Webhook
# Pre-Flight Checklist
Before going live, verify your webhook setup:
- [ ] Endpoint Accessibility - URL responds to external requests
- [ ] HTTPS Certificate - Valid SSL certificate installed
- [ ] Response Time - Endpoint responds within 30 seconds
- [ ] Status Codes - Returns 2xx for successful processing
- [ ] Payload Handling - Correctly parses webhook structure
- [ ] Error Handling - Graceful failure handling implemented
- [ ] Idempotency - Duplicate event handling in place
🎯 Testing Strategy
Use Tillhub's built-in test mode to validate your implementation with realistic test data before processing live events.
# How Tillhub Uses Webhooks
Tillhub webhooks provide real-time notifications by sending HTTPS POST requests to your configured endpoints whenever monitored events occur in your account. This enables your applications to stay synchronized with Tillhub data automatically.
# Webhook Flow
graph LR
    A[Event Occurs] --> B[Tillhub System]
    B --> C[Webhook Queue]
    C --> D[HTTP POST Request]
    D --> E[Your Endpoint]
    E --> F[Process Event]
    F --> G[Return 2xx Status]
    G --> H[Mark as Delivered]

    E --> I[Return Non-2xx]
    I --> J[Retry with Backoff]
    J --> D
2
3
4
5
6
7
8
9
10
11
12
# Key Characteristics
- Protocol: HTTPS POST requests
- Format: JSON payload
- Authentication: Basic Auth + Signature verification
- Retry Logic: Exponential backoff for failures
- Timeout: 30-second response expectation
# Request Format
Every webhook request from Tillhub follows a consistent structure for reliable processing.
# HTTP Request Details
Method: POST
Headers:
Content-Type: application/json
User-Agent: Tillhub HTTP Connector/2.1.0
Authorization: Basic <base64_credentials>  # Optional
Tillhub-Signature: t=<timestamp>,v1=<signature>  # Optional
2
3
4
# Payload Structure
interface WebhookRequest<T = any> {
  webhook_id: string          // Unique webhook identifier
  event_id: string           // Unique event identifier
  event_entity: string       // Entity type (e.g., "transaction", "product")
  event_type: string         // Action type (e.g., "create", "update", "delete")
  event_version: number      // Event schema version
  entity_instance_id: string // Entity instance UUID
  timestamp: string          // ISO 8601 timestamp
  payload: T                 // Entity-specific data
}
2
3
4
5
6
7
8
9
10
# Example Request
{
  "webhook_id": "ff30cfdf-5167-4f72-b4fc-c1d72db3c07e",
  "event_id": "c6fe918a-7bdc-4ccd-af36-95c03853233d",
  "event_entity": "transaction",
  "event_type": "create",
  "event_version": 0,
  "entity_instance_id": "10b06f38-031d-4e0c-8706-0474c8c5b61c",
  "timestamp": "2022-12-13T08:45:00.881Z",
  "payload": {
    "id": "10b06f38-031d-4e0c-8706-0474c8c5b61c",
    "status": "pending",
    "total_amount": 100.0,
    "currency": "EUR",
    "customer_id": "customer-123",
    "items": [
      {
        "product_id": "product-456",
        "quantity": 2,
        "price": 50.0
      }
    ]
  }
}
2
3
4
5
6
7
8
9
10
11
12
13
14
15
16
17
18
19
20
21
22
23
💡 Payload Variations
The payload field structure varies based on event_entity and event_type. See our Event Types Documentation for complete payload specifications.
# Expected Responses and Error Handling
Understanding how Tillhub handles webhook responses and failures is crucial for building reliable integrations. This section covers response expectations, retry mechanisms, and failure scenarios.
# Expected Response Format
Successful Processing: Your webhook endpoint should return a 2xx HTTP status code (200-299) to indicate successful receipt and processing of the webhook event.
HTTP/1.1 200 OK
Content-Type: application/json

{
  "status": "received",
  "event_id": "c6fe918a-7bdc-4ccd-af36-95c03853233d",
  "message": "Event processed successfully"
}
2
3
4
5
6
7
8
Response Requirements:
- ✅ Status Code: Must be 200-299 for success
- ✅ Response Time: Must respond within 30 seconds
- ✅ Content: Response body is optional but recommended for debugging
- ✅ Headers: Standard HTTP headers are sufficient
💡 Best Practice
Return a 200 status immediately upon receiving the webhook, then process the event asynchronously. This prevents timeouts and ensures reliable delivery.
# Error Response Handling
Tillhub categorizes non-2xx responses into different types for appropriate retry behavior:
# Client Errors (4xx)
Status Codes: 400-499 (Bad Request, Unauthorized, Forbidden, Not Found, etc.)
Tillhub Behavior:
- ❌ Automatic Retry - Assumes permanent client-side issue
- 📈 Exponential Backoff - Increasing delays between retries
- 📝 Logged as Error - Marked with
lastResponseType: "error"
Common 4xx Scenarios:
HTTP/1.1 400 Bad Request
Content-Type: application/json

{
  "error": "Invalid JSON payload",
  "details": "Malformed webhook structure"
}
2
3
4
5
6
7
HTTP/1.1 401 Unauthorized
Content-Type: application/json

{
  "error": "Authentication failed",
  "message": "Invalid or missing credentials"
}
2
3
4
5
6
7
HTTP/1.1 404 Not Found
Content-Type: application/json

{
  "error": "Webhook endpoint not found",
  "path": "/webhooks/tillhub"
}
2
3
4
5
6
7
# Server Errors (5xx)
Status Codes: 500-599 (Internal Server Error, Bad Gateway, Service Unavailable, etc.)
Tillhub Behavior:
- 🔄 Automatic Retry - Assumes temporary server-side issue
- 📈 Exponential Backoff - Increasing delays between retries
- 📝 Logged as Error - Marked with
lastResponseType: "error"
Common 5xx Scenarios:
HTTP/1.1 500 Internal Server Error
Content-Type: application/json

{
  "error": "Database connection failed",
  "timestamp": "2022-12-13T14:30:00.000Z"
}
2
3
4
5
6
7
HTTP/1.1 503 Service Unavailable
Content-Type: application/json

{
  "error": "Service temporarily unavailable",
  "retry_after": 300
}
2
3
4
5
6
7
# Redirection Responses (3xx)
Status Codes: 300-399 (Moved Permanently, Found, etc.)
Tillhub Behavior:
- Redirection Responses (3xx): Automatically follows redirects (up to 20 by default). The final response after all redirects determines success or failure. If redirect following fails, the event is retried with exponential backoff.
# Retry Strategy & Exponential Backoff
Tillhub implements a sophisticated retry mechanism for failed webhook deliveries:
# Retry Configuration
| Parameter | Value | Description |
|---|---|---|
| Initial Delay | 30 seconds | Minimum time before first retry |
| Growth Factor | Exponential (e^x) | Exponential increase per retry |
| Maximum Growth | 10 attempts | After 10 retries, interval stops growing |
| Request Timeout | 30 seconds | Maximum time to wait for response |
| Event Retention | 7 days | Failed events kept for manual retry |
# Retry Intervals
The retry delay follows an exponential backoff pattern:
Actual Retry Schedule:
Attempt 1: ~30 seconds     (30s × e^0 ≈ 30s)
Attempt 2: ~81 seconds     (30s × e^1 ≈ 81s)
Attempt 3: ~221 seconds    (30s × e^2 ≈ 221s)
Attempt 4: ~601 seconds    (30s × e^3 ≈ 10 minutes)
Attempt 5: ~1,635 seconds  (30s × e^4 ≈ 27 minutes)
Attempt 6: ~4,447 seconds  (30s × e^5 ≈ 1.2 hours)
Attempt 7: ~12,085 seconds (30s × e^6 ≈ 3.4 hours)
Attempt 8: ~32,849 seconds (30s × e^7 ≈ 9.1 hours)
Attempt 9: ~89,317 seconds (30s × e^8 ≈ 24.8 hours)
Attempt 10+: ~242,826 seconds (30s × e^9 ≈ 67.5 hours)
2
3
4
5
6
7
8
9
10
⚠️ Retry Behavior
- 4xx errors: No automatic retries (manual intervention required)
- 5xx errors: Exponential backoff retries until event expires
- 3xx redirects: Automatic retry with redirect following
- Timeouts: Treated as 5xx errors with exponential backoff
# When Retries Stop
Tillhub stops retrying webhook deliveries in the following scenarios:
# 1. Successful Delivery ✅
- Endpoint returns 2xx status code
- Event marked as
sentSuccessfully: true - No further attempts made
# 2. Client Errors ❌
- Automatic retries
- Doesn't Require manual intervention and retry
# 3. Webhook Deactivation 🔇
- Webhook disabled in Dashboard
- All pending events for that webhook stop processing
- Events remain in queue until webhook reactivated
# Debugging Failed Deliveries
# Dashboard Monitoring
Event Status Indicators:
- Successfully delivered (2xx response)
- Failed delivery (4xx/5xx response or timeout)
- Pending retry
# Common Failure Scenarios
1. Endpoint Timeout
{
  "error": "Request timeout",
  "details": "No response received within 30 seconds",
  "retry_behavior": "Exponential backoff"
}
2
3
4
5
2. Connection Refused
{
  "error": "Connection refused",
  "details": "Unable to connect to webhook endpoint",
  "retry_behavior": "Exponential backoff"
}
2
3
4
5
3. SSL Certificate Issues
{
  "error": "SSL verification failed",
  "details": "Invalid or expired SSL certificate",
  "retry_behavior": "No retry (fix certificate)"
}
2
3
4
5
4. DNS Resolution Failure
{
  "error": "DNS resolution failed",
  "details": "Unable to resolve webhook hostname",
  "retry_behavior": "Exponential backoff"
}
2
3
4
5
# Error Rate Monitoring
Tillhub tracks webhook performance metrics:
Webhook Health Metrics:
- Success Rate: Percentage of successful deliveries
- Average Response Time: Mean response time for successful requests
- Error Rate: Percentage of failed deliveries over time
- Retry Count: Average number of retries per event
Automatic Webhook Deactivation:
- High error rates may trigger automatic webhook deactivation
- Prevents resource waste on consistently failing endpoints
- Manual reactivation required after fixing issues
# Best Practices for Error Handling
# 1. Implement Proper Response Codes
# 2. Handle Idempotency
# 3. Implement Circuit Breaker
# 4. Monitor and Alert
# Steps to Receive Webhooks
Follow these steps to implement webhook handling in your application:
# Step 1: Identify Events to Monitor
Choose the events that matter to your application:
Popular Event Types:
transactions.create.v0- New transactionsproducts.update.v0- Product changescustomers.create.v0- New customersstocks.update.v0- Inventory changes
📚 Complete Event List: Event Types Documentation
# Step 2: Create Webhook Endpoint
Build an HTTP endpoint that accepts unauthenticated POST requests:
# Step 3: Handle Webhook Events
Process different event types based on your business logic:
# Security
Securing your webhooks is crucial to ensure that requests are genuinely from Tillhub and not from malicious actors. Tillhub supports two primary authentication methods that can be used independently or together for enhanced security.
# Authentication Options
# 1. Basic Authentication (Built-in)
Basic authentication uses a username and password combination that you configure when creating your webhook. Tillhub will include these credentials in the Authorization header of each webhook request.
Configuration: When creating your webhook, provide:
- Username: Your chosen username for authentication
- Password: A strong password for authentication
How it works:
- Tillhub sends an
Authorization: Basic {base64_encoded_credentials}header - The credentials are base64-encoded in the format
username:password - Your endpoint should validate these credentials before processing the webhook
Implementation Example:
# 2. Webhook Signatures (Recommended)
Webhook signatures provide cryptographic proof that the webhook request originated from Tillhub. This method is more secure than basic authentication alone and is the recommended approach for production environments.
How it works:
- Tillhub generates a unique signing secret for each webhook
- Each webhook request includes a
Tillhub-Signatureheader containing a timestamp and HMAC-SHA256 signature - Your endpoint verifies the signature using the shared secret
Signature Format:
Tillhub-Signature: t=1669124083188,v1=tPn4jcqptzmComnm4UxlSLAfxf+5/730jqwNSu4Bjdk=
Implementation Example:
# Security Best Practices
# 1. Use Both Authentication Methods
For maximum security, implement both basic authentication and signature verification:
# 2. Implement Proper Error Handling
- Return specific error codes for different failure types
- Log security violations for monitoring
- Don't expose sensitive information in error messages
# 3. Validate Request Structure
# 4. Implement Rate Limiting
# 5. Use HTTPS Only
- Always use HTTPS endpoints in production
- Ensure your SSL certificate is valid and up-to-date
- Consider using HSTS headers
# 6. Store Secrets Securely
// ✅ Good - Use environment variables
const WEBHOOK_SECRET = process.env.TILLHUB_WEBHOOK_SECRET
const WEBHOOK_USERNAME = process.env.TILLHUB_WEBHOOK_USERNAME
const WEBHOOK_PASSWORD = process.env.TILLHUB_WEBHOOK_PASSWORD

// ❌ Bad - Hard-coded secrets
const WEBHOOK_SECRET = 'my-secret-key'
2
3
4
5
6
7
# 7. Monitor and Alert
- Set up monitoring for failed authentication attempts
- Alert on unusual webhook patterns
- Log all security-related events
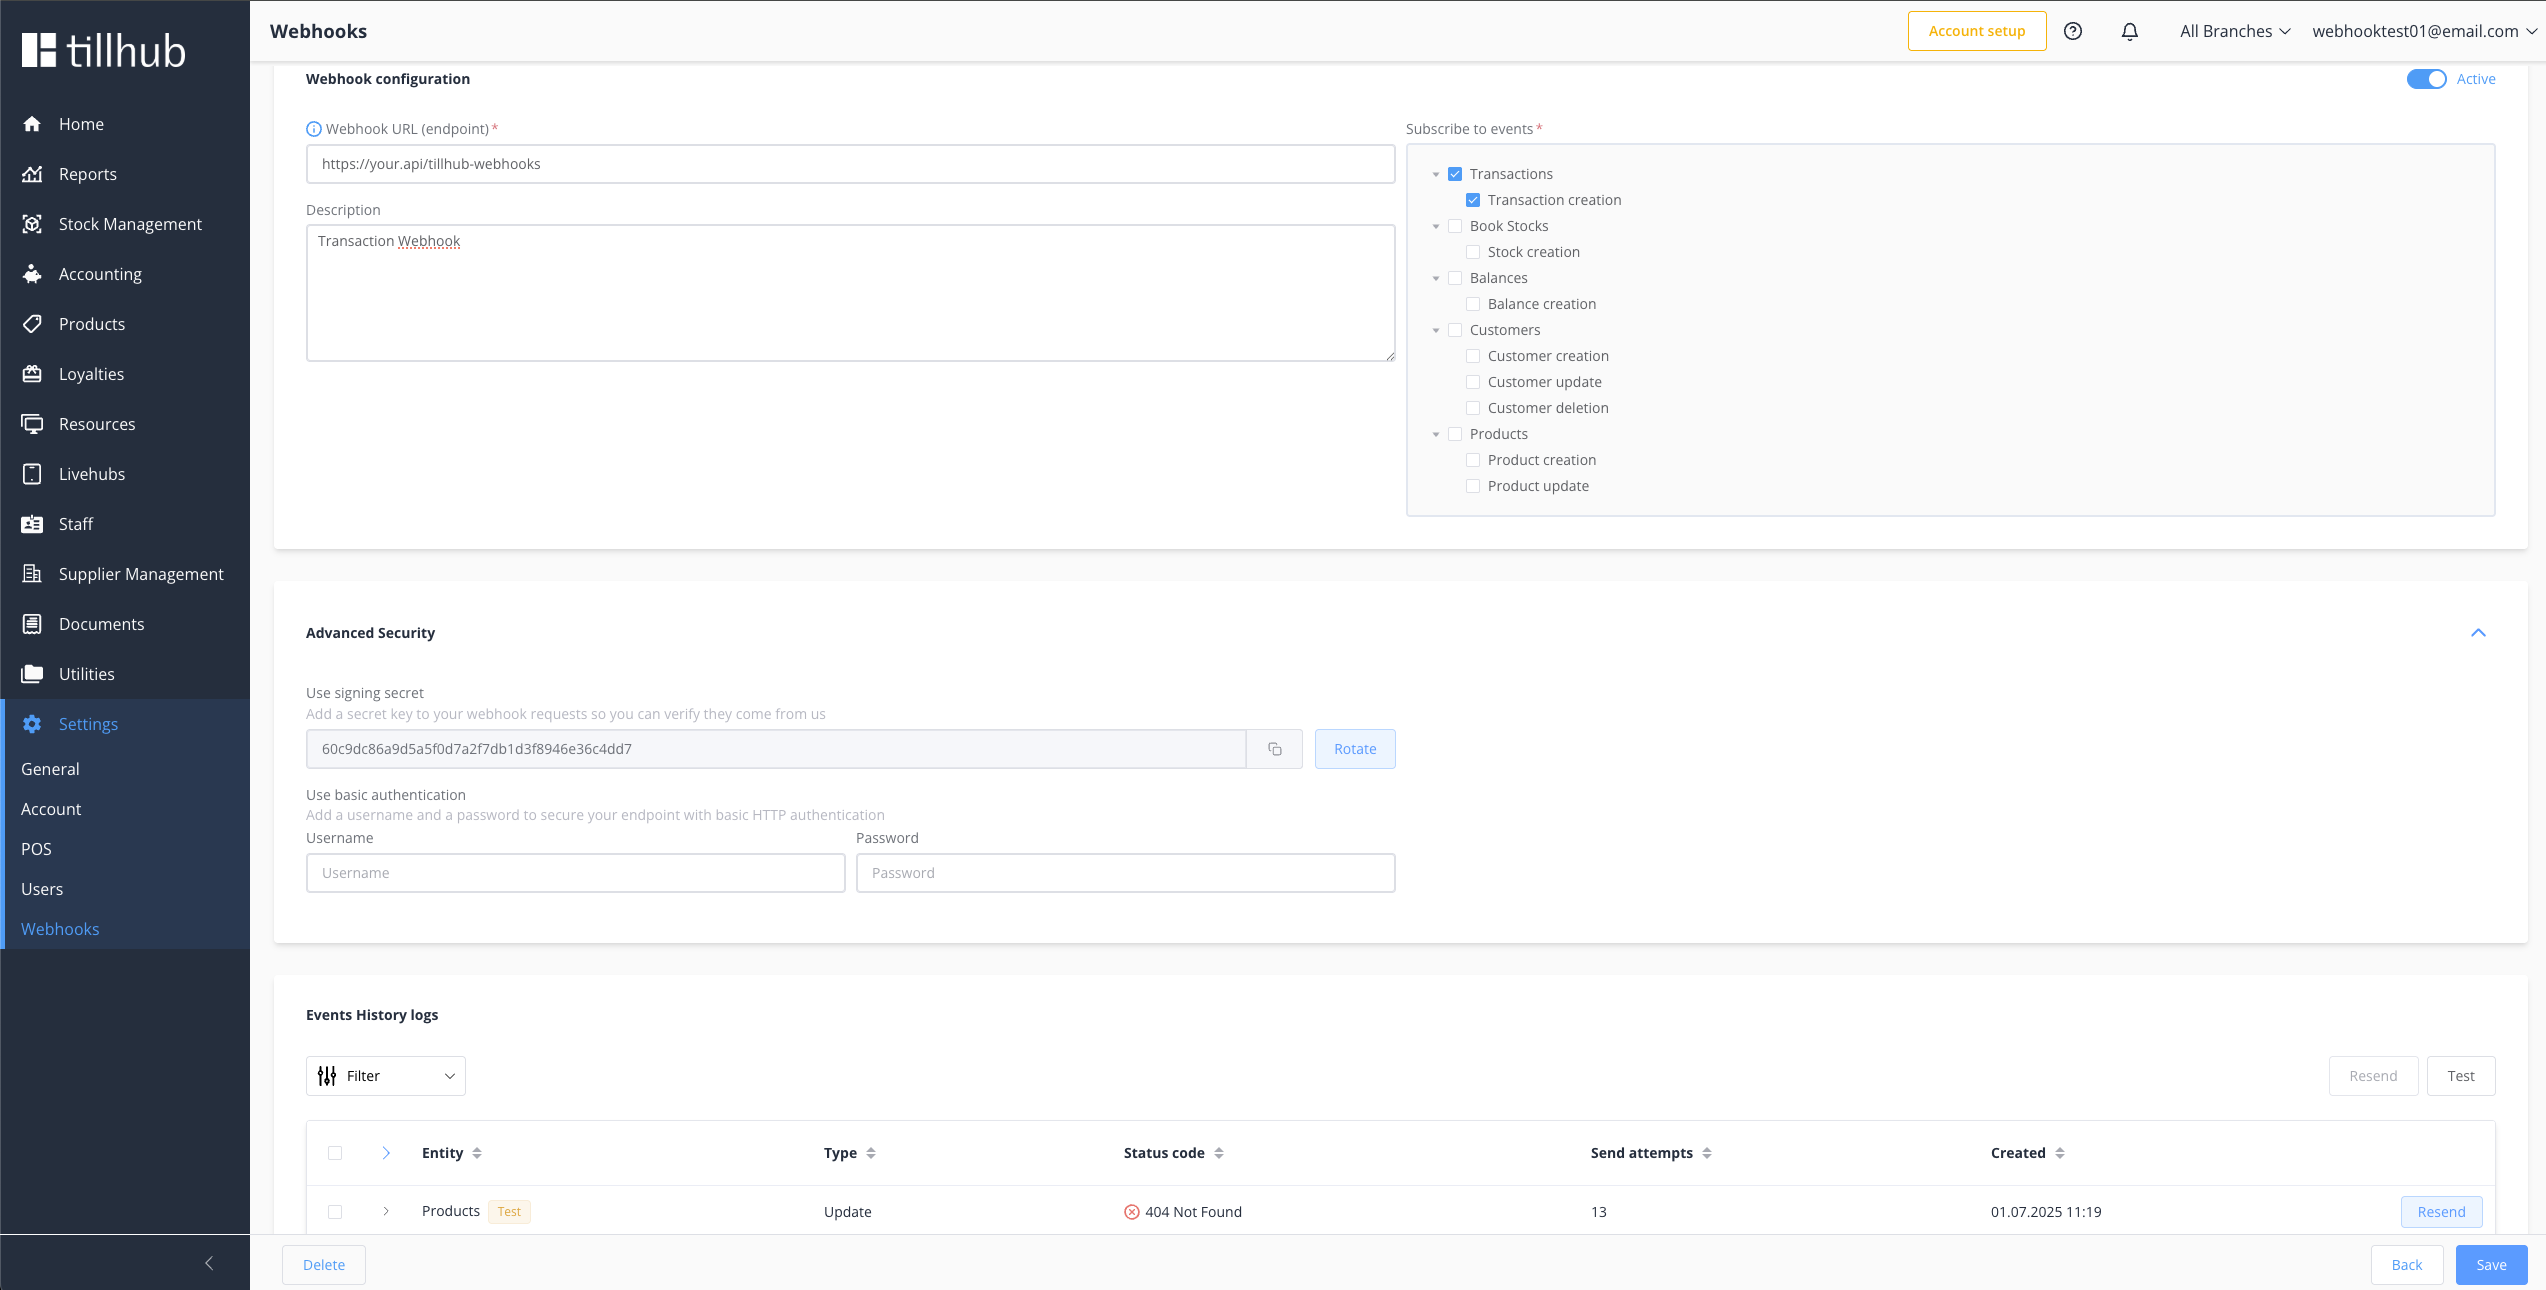
# Getting Your Signing Secret
- Create a webhook in the Tillhub Dashboard
- Copy the signing secret from the webhook details page
- Store it securely in your environment variables
- Use it in your verification code as shown in the examples above
Security Considerations
- Never expose your signing secret in client-side code or logs
- Rotate your secrets regularly
- Monitor for any suspicious webhook activity
For detailed signature verification implementation, see the complete Webhook Signatures Guide.
# Monitoring and Management
After creating your webhook, monitor its performance through the Tillhub Dashboard:
- Select Webhook → Click on your webhook from the overview page
- View Details → See configuration settings and delivery history
- Monitor Status → Check real-time delivery indicators
# Event Status Indicators
| Status | Description |
|---|---|
| Success | Event successfully delivered and processed |
| Failed | Event delivery failed or returned error |
| Pending | Payload sent to your endpoint |
# Event Retry Management
Individual Event Retry:
- Click Resend button next to events
- Useful for one-off failures or testing
Bulk Operations:
- Select Multiple → Use checkboxes to select events
- Resend Selected → Retry multiple events at once
- Resend All → Mass retry with optional filters
::: info 📊 Delivery Analytics Track your webhook performance with built-in metrics:
- Success rate percentage
- Average response time
- Failed delivery patterns
- Event volume trends :::
# Troubleshooting Common Issues
# Webhook Not Receiving Events
Diagnostic Steps:
Connectivity Check
# Test external accessibility
curl -X POST https://your-domain.com/webhooks \
     -H "Content-Type: application/json" \
     -d '{"test": "connectivity"}'
1
2
3
4SSL Certificate Validation
# Check certificate validity
openssl s_client -connect your-domain.com:443 -servername your-domain.com
1
2Event Configuration Review
- ✅ Webhook is active in Dashboard
- ✅ Correct event types selected
- ✅ Account permissions verified
# High Failure Rates
Common Causes & Solutions:
| Issue | Cause | Solution |
|---|---|---|
| Timeouts | Slow response (>30s) | Optimize processing, return 200 immediately |
| Wrong Status | Non-2xx responses | Return 200-299 for successful processing |
| Server Errors | Application crashes | Implement proper error handling |
| Invalid Payload | Parsing failures | Validate JSON structure before processing |
# Authentication Failures
Troubleshooting Steps:
Basic Auth Issues
- Verify username/password in Dashboard
- Check base64 encoding implementation
- Validate Authorization header parsing
Signature Verification Problems
- Confirm signing secret is correct
- Verify HMAC-SHA256 implementation
- Check timestamp validation logic
# Missing Webhooks Deep Dive
When webhooks aren't arriving, follow this systematic debugging approach:
# Phase 1: Configuration Verification
# Common response format:
{
  "timestamp": "2024-01-15T10:30:00Z",
  "endpoint": "operational",
  "database": {
    "status": "healthy",
    "response_time_ms": 15.2,
    "error": null
  },
  "ssl_certificate": {
    "status": "valid",
    "expiry_date": "2024-12-31T23:59:59Z",
    "days_until_expiry": 351,
    "subject": "webhook.example.com"
  },
  "recent_events": 1247,
  "error_rate": 0.023
}
2
3
4
5
6
7
8
9
10
11
12
13
14
15
16
17
# Phase 2: Network Diagnostics
# Complete network diagnostic script
#!/bin/bash

echo "🔍 Webhook Connectivity Diagnostics"
echo "=================================="

WEBHOOK_URL="https://your-domain.com/webhooks"

# Test 1: Basic connectivity
echo "1. Testing basic connectivity..."
curl -I $WEBHOOK_URL

# Test 2: SSL certificate
echo "2. Checking SSL certificate..."
curl -sS --insecure -I $WEBHOOK_URL | grep -i ssl

# Test 3: Response time
echo "3. Measuring response time..."
curl -w "Response time: %{time_total}s\n" -o /dev/null -s $WEBHOOK_URL

# Test 4: POST request simulation
echo "4. Testing POST request..."
curl -X POST $WEBHOOK_URL \
     -H "Content-Type: application/json" \
     -H "User-Agent: Tillhub-Webhook-Test/1.0" \
     -d '{"test": true, "timestamp": "'$(date -u +%Y-%m-%dT%H:%M:%S.%3NZ)'"}'
2
3
4
5
6
7
8
9
10
11
12
13
14
15
16
17
18
19
20
21
22
23
24
25
26
# Phase 3: Server-Side Monitoring
# Best Practices and Tips
# Performance Optimization
# 1. Immediate Response Pattern
# 2. Database Connection Pooling
// Configure connection pool for high throughput
const pool = new Pool({
  host: process.env.DB_HOST,
  port: process.env.DB_PORT,
  database: process.env.DB_NAME,
  user: process.env.DB_USER,
  password: process.env.DB_PASSWORD,
  max: 20, // Maximum connections
  idleTimeoutMillis: 30000,
  connectionTimeoutMillis: 2000,
})
2
3
4
5
6
7
8
9
10
11
# 3. Queue-Based Processing
# Idempotency Implementation
# Database-Based Tracking
-- Processed events table
CREATE TABLE processed_webhook_events (
    event_id UUID PRIMARY KEY,
    webhook_id UUID NOT NULL,
    event_type VARCHAR(100) NOT NULL,
    processed_at TIMESTAMP DEFAULT NOW(),
    payload_hash VARCHAR(64),
    processing_duration_ms INTEGER,
    created_at TIMESTAMP DEFAULT NOW()
);

-- Indexes for performance
CREATE INDEX idx_processed_events_webhook_id ON processed_webhook_events(webhook_id);
CREATE INDEX idx_processed_events_type_date ON processed_webhook_events(event_type, processed_at);
2
3
4
5
6
7
8
9
10
11
12
13
14
# Common database schema required:
CREATE TABLE processed_webhook_events (
    event_id VARCHAR(255) PRIMARY KEY,
    webhook_id VARCHAR(255) NOT NULL,
    event_type VARCHAR(100) NOT NULL,
    processing_duration_ms BIGINT NOT NULL,
    payload_hash VARCHAR(64) NOT NULL,
    processed_at TIMESTAMP DEFAULT CURRENT_TIMESTAMP,
    INDEX idx_webhook_id (webhook_id),
    INDEX idx_event_type (event_type),
    INDEX idx_payload_hash (payload_hash)
);
2
3
4
5
6
7
8
9
10
11
# Monitoring and Observability
# 1. Structured Logging
# 2. Metrics Collection
# 3. Health Checks
# Advanced Topics
# Event Sourcing Integration
# Webhook Aggregation
# Webhook Replay System
# Step 5: Register Webhook in Tillhub Dashboard
Complete your webhook setup by registering it in the Tillhub Dashboard.
# Dashboard Access
Navigate to webhook management:
- Login → Tillhub Dashboard (opens new window)
- Settings → Click on Settings in navigation
- Webhooks → Select Webhooks from menu
- Overview → View all existing webhooks
# Creating New Webhooks
# Step-by-Step Creation
- New Webhook → Click New button on overview page
- Configuration → Fill in required webhook details
- Event Selection → Choose events to monitor
- Security Setup → Configure authentication options
- Save & Activate → Click Save to create webhook
# Configuration Checklist
- [ ] Endpoint URL - Valid HTTPS URL
- [ ] Event Types - Selected relevant events
- [ ] Authentication - Username/password configured
- [ ] Description - Clear purpose description
- [ ] Active Status - Enabled for production
# Webhook Management
# Viewing Webhook Details
Access detailed webhook information:
- Select Webhook → Click on webhook from overview
- Configuration → View/edit webhook settings
- Event History → Monitor delivery attempts
- Performance → Check success/failure rates
# Event Status Indicators
| Status | Description |
|---|---|
| Success | Event delivered and processed successfully |
| Failed | Event delivery failed or returned error |
| Pending | Payload sent to endpoint |
# Bulk Operations
Individual Actions:
- Resend → Retry single failed event
- View Details → Inspect payload and responses
Bulk Actions:
- Select Multiple → Choose events with checkboxes
- Resend Selected → Retry multiple events
- Resend All → Mass retry with filters
# Event Details View
# Payload Inspection
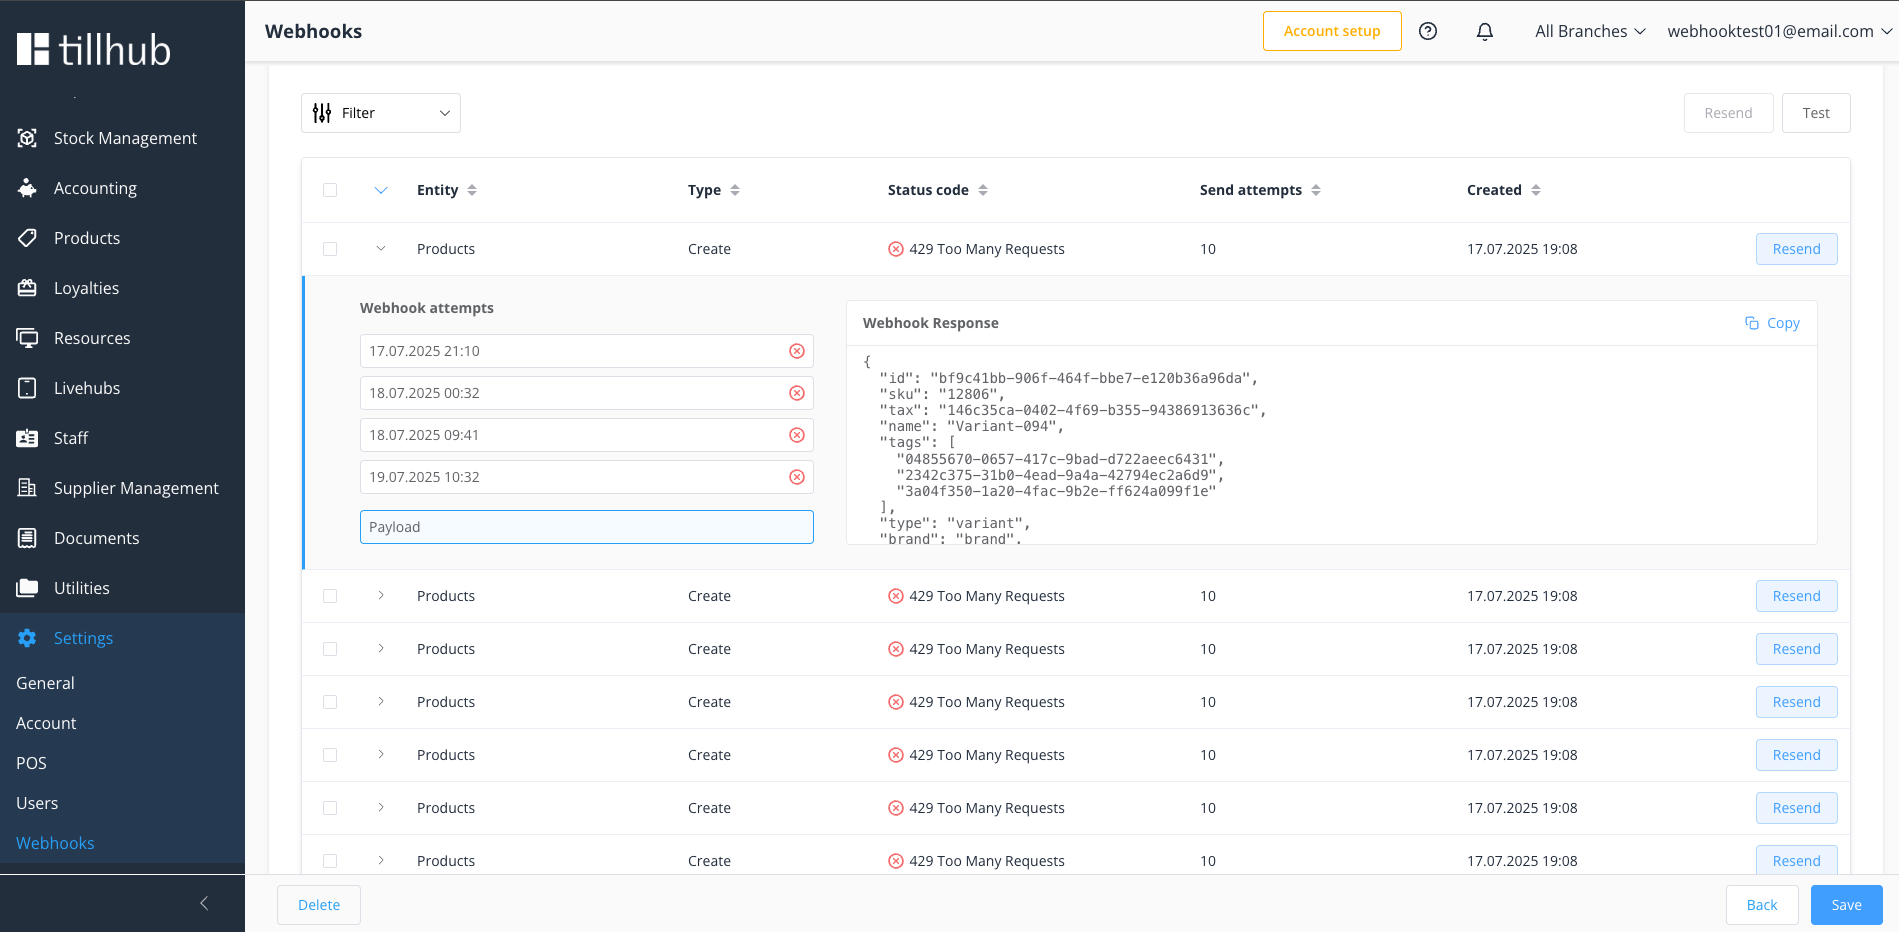
Original payload sent to your endpoint
# Error Analysis
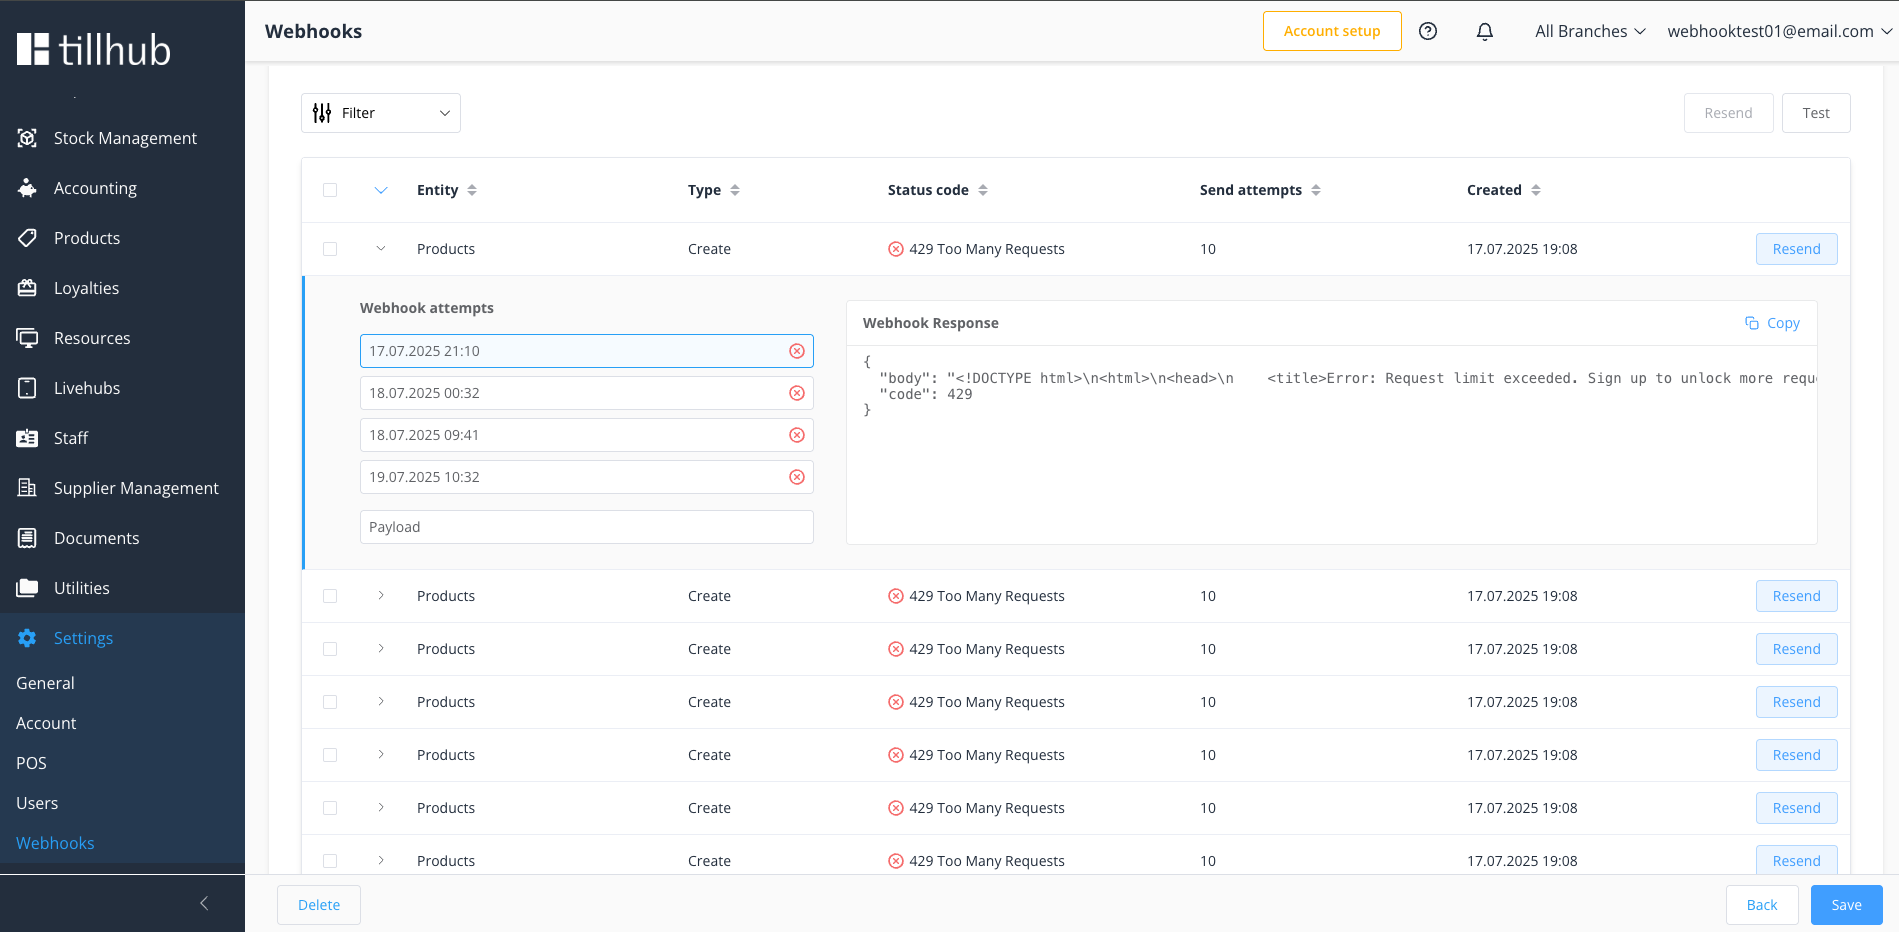
Error response from your endpoint
# Success Confirmation
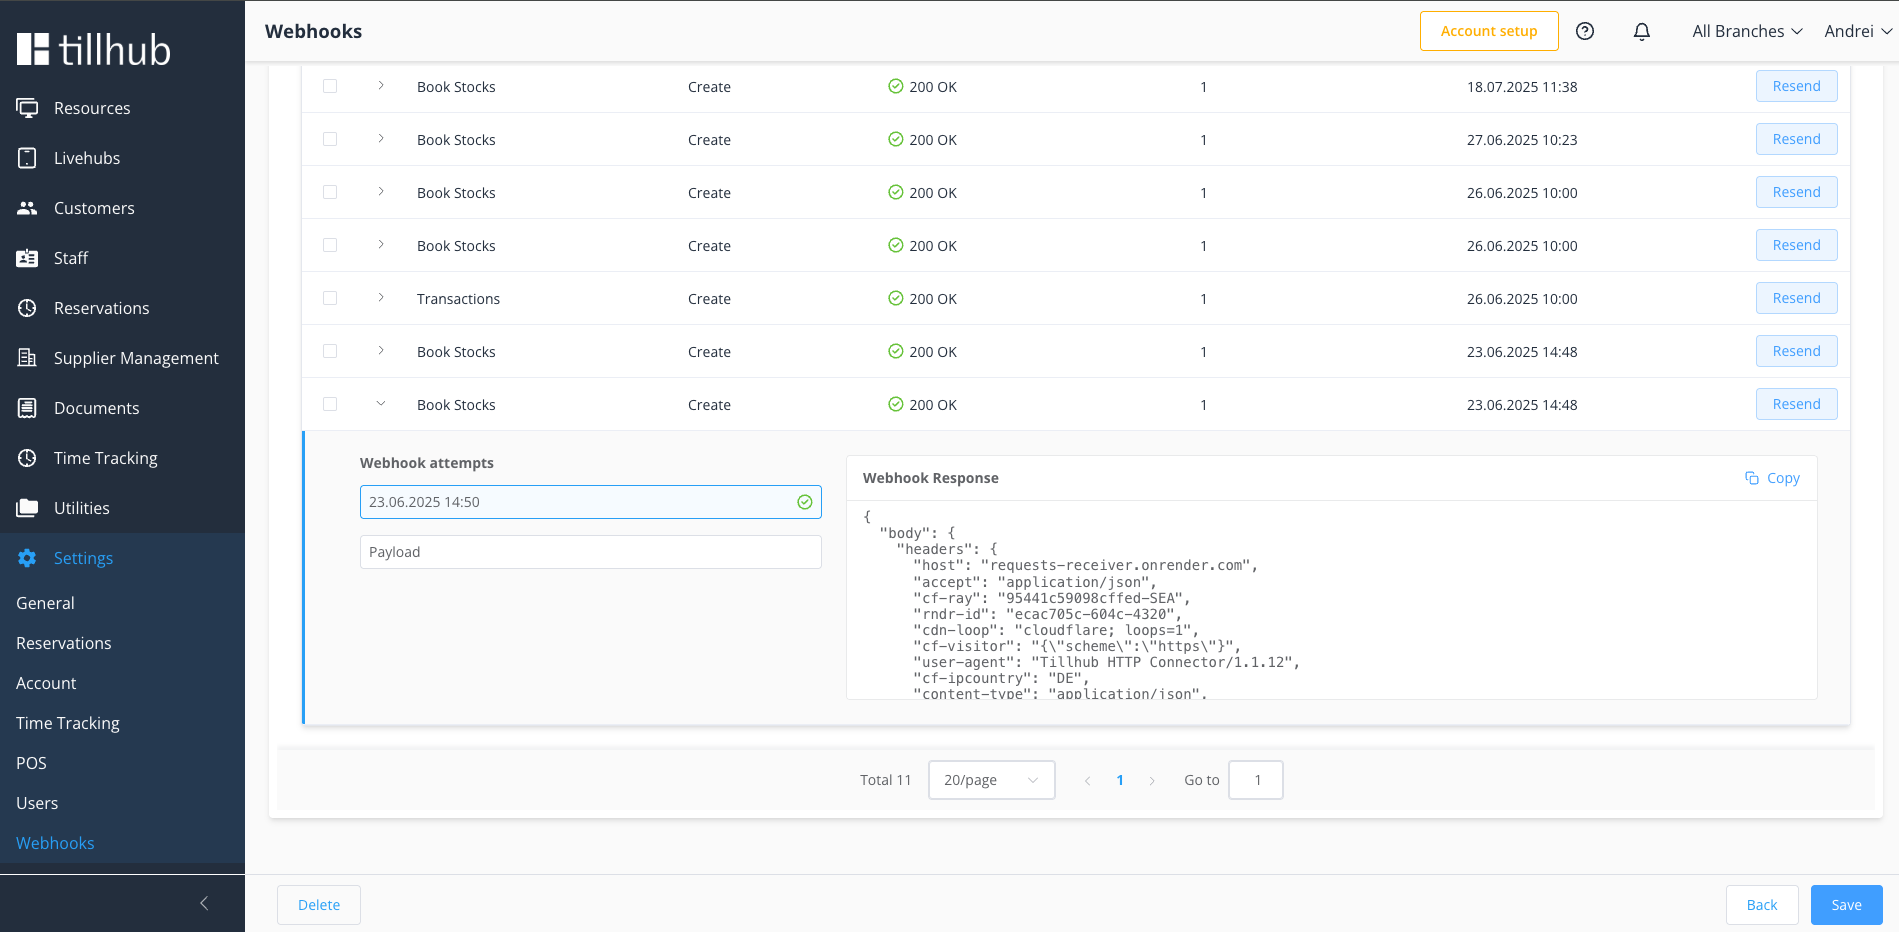
Successful response from your endpoint
# Testing Webhooks
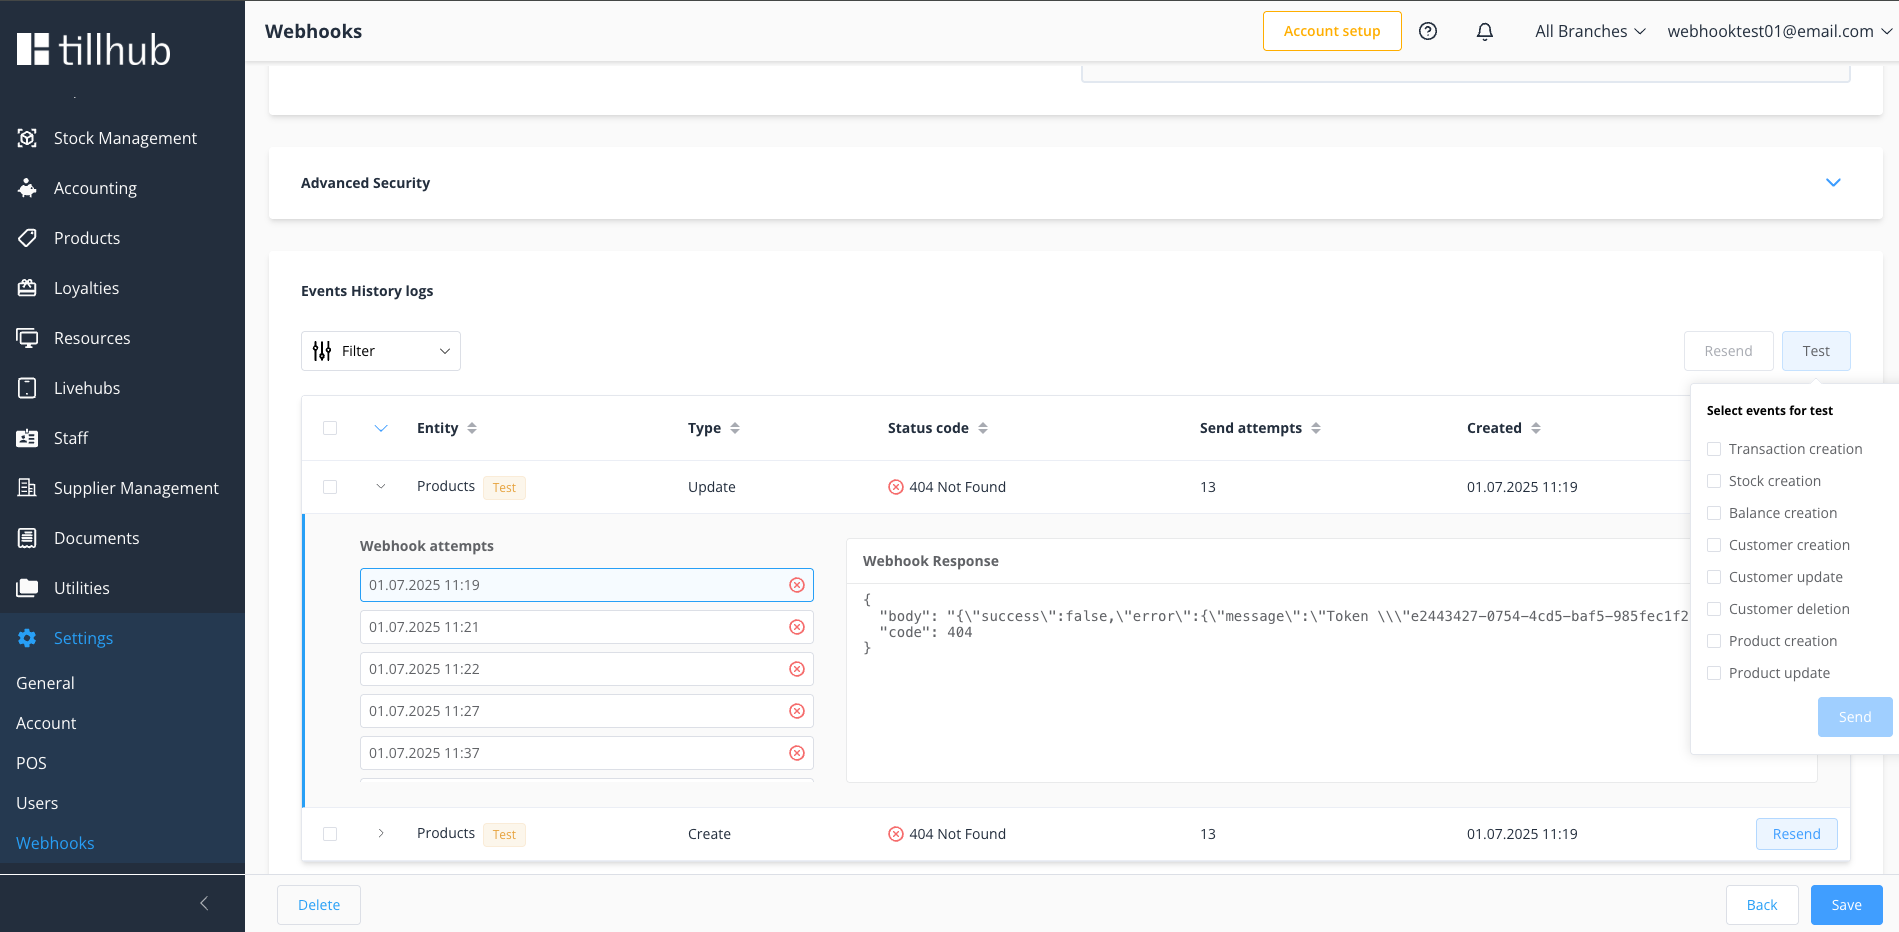
# Event Testing Interface
The Tillhub Dashboard provides an integrated testing environment that enables you to validate your webhook endpoints with authentic test data before processing live events. This built-in testing capability ensures your integration works correctly without affecting production data.
# Testing Workflow
- Access Test Function → Navigate to your webhook configuration and click the Test button
- Select Event Type → A dropdown menu displays all available event types for testing
- Choose Target Event → Select the specific event type you want to test from the comprehensive list
- Send Test Request → Click the Send button to dispatch the test payload to your configured endpoint
- Monitor Results → Review the response and verify your endpoint processes the test event correctly
# Test Event Processing
When you initiate a test event:
- Dummy Data Generation → Each event type has pre-configured realistic test data that mirrors production payloads
- Background Processing → The webhook service follows the same delivery logic as live events, including retry mechanisms and error handling
- Real-time Validation → Your endpoint receives an authentic webhook request structure for comprehensive testing
# Test Event Identification
Test events are clearly distinguished from production events through visual indicators and payload markers:
Visual Indicators:
- Test Badge → Test events display a distinctive badge labeled "Test"
- Event List Marking → Test events are clearly identified in the webhook events history
Payload Markers:
- Test-specific identifiers in event metadata
- Dummy data values that are realistic but clearly non-production
- Consistent test event structure following production specifications
# Benefits of Integrated Testing
Development Validation:
- Verify endpoint connectivity and authentication
- Test payload parsing and data handling logic
- Validate response time requirements and error handling
- Confirm idempotency and duplicate event management
Production Readiness:
- Ensure webhook integration stability before going live
- Test all subscribed event types systematically
- Validate security implementations including signature verification
- Confirm proper logging and monitoring capabilities
This testing framework provides confidence that your webhook implementation will handle production events reliably while maintaining the security and performance standards required for live operations.
# Summary
You now have a comprehensive understanding of Tillhub webhooks! Here's what you've learned:
# ✅ Key Takeaways
- 🔗 Real-time Integration - Webhooks provide instant notifications for important events
- 🛡️ Security First - Always implement signature verification and use HTTPS
- ⚡ Performance Matters - Return 2xx responses immediately, process asynchronously
- 🔄 Handle Failures - Implement idempotency and proper error handling
- 📊 Monitor Everything - Use logging, metrics, and health checks
- 🧪 Test Thoroughly - Validate your implementation before going live
# 🚀 Next Steps
- Implement Your Endpoint - Use the code examples as starting points
- Configure Security - Set up signature verification
- Test Integration - Use Tillhub's test mode
- Monitor Production - Set up logging and alerting
- Scale as Needed - Implement queuing for high volume
# 📚 Additional Resources
- Event Types Documentation - Complete event reference
- Webhook Signatures Guide - Detailed security implementation
- API Documentation (opens new window) - Full Tillhub API reference
💬 Need Help?
If you encounter issues or have questions about webhook implementation, reach out to our support team or consult the detailed documentation linked above.
Happy Webhooking! 🎉